



How To Replace an OEM Alternator

You can change an alternator in your car by following clear steps and using simple tools. The alternator charges your battery and runs the electrical system. OEM alternators can fail from too much electricity, belt issues, or dirt. You may see dim headlights or a battery that will not charge all the way. Before you begin, collect all the tools and parts you need. Many people who like to fix things themselves can do this job and save money on labor.
OEM Alternator Tools And Parts
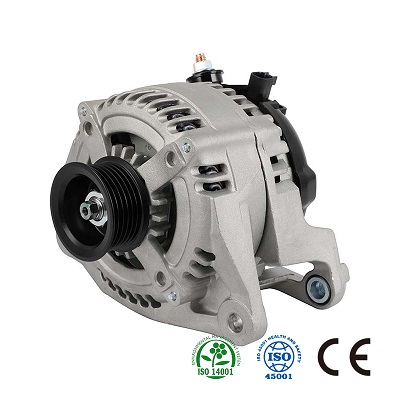
Before you start working on your vehicle, you need to gather the right tools and parts. This step helps you avoid delays and keeps your workspace organized. You will use these items to remove the old alternator and install the new oem alternator.
Required Tools
You need a few basic tools to replace the alternator. Most of these tools are common in home garages. Here is a list to help you get ready:
Socket set (metric and standard sizes)
Ratchet wrench
Combination wrenches
Screwdrivers (flathead and Phillips)
Pry bar or large flathead screwdriver
Torque wrench
Belt tensioner tool (if your car uses a serpentine belt)
Flashlight or work light
Tip: Keep your tools within reach. This makes the job faster and safer.
Parts Checklist
You must have all the correct parts before you begin. Using the right oem parts ensures your alternator works well with your vehicle. Check this list:
Part | Description |
|---|---|
The new alternator for your model | |
Serpentine belt | Replace if worn or cracked |
Mounting bolts | Use new bolts if old ones are rusty |
Electrical connectors | For damaged or corroded plugs |
Always match the oem alternator to your car’s make and model. Using the wrong oem part can cause problems.
Safety Gear
Safety should come first when you work on your car. You protect yourself and avoid injury by using the right gear:
Safety glasses
Mechanic gloves
Closed-toe shoes
Long sleeves
Note: Always disconnect the battery before you touch the alternator. This step prevents electric shock.
Replace An Alternator: Step-By-Step
Disconnect Battery
First, make sure your car is turned off and parked flat. Open the hood and find the battery. Always take off the negative battery cable first. This keeps you safe from electric shock and stops short circuits. Use a wrench to loosen the nut on the negative terminal. Pull the cable away from the battery. Put it aside so it does not touch any metal.
Safety Tip: Never skip this step. Taking off the negative battery cable keeps you and your car’s electronics safe.
Locate Alternator
Now, you need to find the alternator in the engine bay. Look for a part with a silver case and copper wires you can see. You can follow the serpentine belt to find it. Most cars have the alternator close to the engine block. Some cars put it on the lower passenger side. The wiring plugs might look different on a new oem alternator. Take a picture before you unplug any wires. This helps you remember where each wire goes later.
Remove Serpentine Belt
You must take off the serpentine belt to get the alternator out. Find the belt tensioner and use a tool or ratchet to make the belt loose. Slide the belt off the alternator pulley. Watch how the belt goes around the pulleys. Draw a picture or take a photo to help you remember. If the belt looks old or cracked, plan to put in a new one now.
️ Tip: Clean the pulley grooves before you put on a new belt. Dirt can make the belt slip and make noise.
Loosen Pivot And Mounting Bolts
Next, loosen the bolts that hold the alternator in place. Hold the alternator with one hand before you take out the top bolt. This stops it from falling. Turn the alternator a little to reach the wires and connector. Loosen the top bolt but let the alternator move. Find the lower bolt and slide it out. Keep all bolts in a safe spot for later.
Remove Old Alternator
After the bolts are out, gently pull the alternator away from the engine. Unplug the wires and connectors. If you see rust or damage on the plugs, think about replacing them. Set the old alternator aside. Do not throw it away. Many auto parts stores take used oem alternator units for recycling. You can also take out the copper winding for proper disposal.
Install The New Alternator
Get your new oem alternator and check it against the old one. Make sure the mounting spots and connectors are the same. Slide the new alternator into place. Put in the lower bolt and tighten it by hand. Move the alternator to line up the top bolt hole. Put in and tighten the top bolt. Attach the wires and connectors. Check that every connection is tight. Tighten all bolts to the oem specs. This keeps the alternator in place and working right.
Make sure the belt is the right size and goes on correctly.
Adjust the tensioner so the belt is tight enough.
Check all the wires again before you finish.
Reattach Belt And Battery
Put the serpentine belt back on the pulleys, using your picture or drawing. Hold the tensioner loose while you slip the belt over the last pulley. Let go of the tensioner to tighten the belt. Check the belt to make sure it sits in all the grooves. Reconnect the negative battery cable to the battery. Tighten the nut with a wrench.
Start the engine and let it run for a minute. Listen for strange noises or warning lights. Turn on the headlights and blower. Use a multimeter to check the battery voltage. The number should show the alternator is charging the battery. If everything looks good, you are done replacing the alternator.
Final Check: Always check all bolts and wires before you finish. A loose wire can cause a bad alternator or charging problems later.
Replacing an alternator is a common diy job. You can save money and learn about your car by doing it yourself. If you have trouble, look at your oem manual or ask a pro for help.
Installation Checks And Troubleshooting
Verify Installation
After you finish the oem alternator installation, you need to check your work. This step helps you avoid problems with the charging system. Use this checklist to confirm a successful installation:
Check that all grounds connect tightly and have no rust.
Look for any aftermarket devices that could affect the charging system.
Make sure the alternator communicates with your car’s computer.
Test for voltage drops in the wiring between the alternator and the battery.
Use a multimeter to check the voltage at the battery. The reading should be between 13.5 and 14.5 volts when the engine runs.
Tip: If you see a voltage outside this range, you may have a bad alternator or a wiring issue.
Common Issues After Installation
Sometimes, problems show up after you finish the oem alternator replacement. Watch for these common issues in your charging system:
Overcharging, which can damage the battery.
Undercharging, which can leave the battery weak.
No charge at all, which means the charging system does not work.
Mechanical issues, such as loose bolts or a belt that slips.
If you notice any of these, check your installation steps again. A bad alternator or a mistake in the wiring can cause these problems.
When To Seek Professional Help
You can fix many charging system issues yourself, but some signs mean you should get help from a professional. Watch for these symptoms:
Warning lights on your dashboard stay on.
Headlights look dim or flicker.
You hear strange noises from the engine, like grinding or whining.
The car has trouble starting.
Note: DIY alternator installation can be tricky. Many people think it is easy, but it needs careful work and the right tools. If you feel unsure, ask a pro to check your oem alternator and charging system. This step can save you time and prevent a bad alternator from causing more damage.
You can change your oem alternator by doing these steps:
Check the oem alternator and get your tools ready.
Take off the battery cable and find the oem alternator.
Remove the serpentine belt and unplug the wires.
Take out the bolts and look at both oem alternators.
Put in the new one, put the belt back on, and hook up the battery.
Always check every wire and bolt again. Use your checklist to make sure the oem alternator is safe. If you are not sure or see a problem, ask a pro for help.
FAQ
How do you know if your alternator is not charging the battery?
You can check the dashboard for a battery warning light. Use a multimeter to test voltage at the battery. If the reading is low, the charging system may not work. Dim lights or slow accessories also show charging problems.
Can you drive with a bad alternator?
You should not drive with a bad alternator. The battery will lose power because the charging system cannot keep up. Your car may stop running if the charging fails. Always fix charging issues before you drive again.
Why does my new alternator still not charge the battery?
You may have a wiring problem or a loose belt. Check all connections and make sure the belt is tight. The charging system needs every part to work. If charging still fails, test the battery and look for blown fuses.
How often should you check your charging system?
You should check your charging system every six months. Regular checks help you find charging issues early. Look for warning lights, test battery voltage, and listen for strange sounds. Good charging keeps your car running well.
What tools help test the charging system?
A digital multimeter helps you test the charging system. You can measure battery voltage and see if charging works. Some auto parts stores offer free charging tests. Always use the right tool for safe charging checks.
Get Exclusive Industry Insights Delivered. Please Contact Us!
Recommended Products

OEM 50905072 24V Starter Motor – Aftermarket Replacement for SCANIA & Heavy-Duty Applications

New 24V 120A Alternator A003TV9171A for MAN TRUCK, Wholesale for Aftermarket

MR493460 ABS Sensor Rear Right Fits Mitsubishi Outlander 2003-2006
4670A579 ABS Sensor Rear Left Fits Mitsubishi ASX, Outlander Sport, RVR 2008-2013